The Art of Time: A Friendly, Real-World Guide to Shutter Speed (For Cameras and Phones)
Estimated read time: ~12–15 minutes
You can learn a lot about a photographer by how they treat time. Some of us like to slice it razor-thin—catching a dancer mid-leap or a splash frozen in mid-air. Others prefer to stretch it—letting motorbike headlights become neon ribbons or the sea soften into silk. The tool that lets you do either is shutter speed.
This guide is your practical, human-sized walk through shutter speed: what it is, how it affects your images, when to use it, and why it matters even if you only shoot on a smartphone. We’ll keep the tone friendly, the examples grounded in real life (hello Phuket sunsets and busy markets), and the advice actionable. By the end you’ll know how to choose the right setting without guesswork—and you’ll have a few mini-exercises you can try the next time you step outside.
What Is Shutter Speed (In Plain Language)?
Shutter speed is the amount of time your camera’s sensor is exposed to light. It’s written in seconds or fractions of a second—1/2000s, 1/500s, 1/60s, 1s, 10s, and so on.
- Fast shutter speeds (like 1/1000s) let in less light and freeze motion.
- Slow shutter speeds (like 1s or 10s) let in more light and blur motion.
If you’ve ever blinked quickly to avoid dust, that’s a fast shutter. If you’ve lingered with your eyes open to soak up a twilight view, that’s slow.
Two big things change when you change shutter speed:
- Motion – Fast = crisp action; slow = motion blur.
- Brightness – Fast = darker; slow = brighter.
Because brightness is also affected by aperture (lens opening) and ISO (sensor sensitivity), shutter speed is one corner of the exposure triangle. Any time you adjust one corner, you often adjust one of the others to keep your exposure balanced.
Why Shutter Speed Matters (Beyond the Tech)
Shutter speed is less about numbers and more about story. It answers a creative question:
Do you want to show movement or stop it?
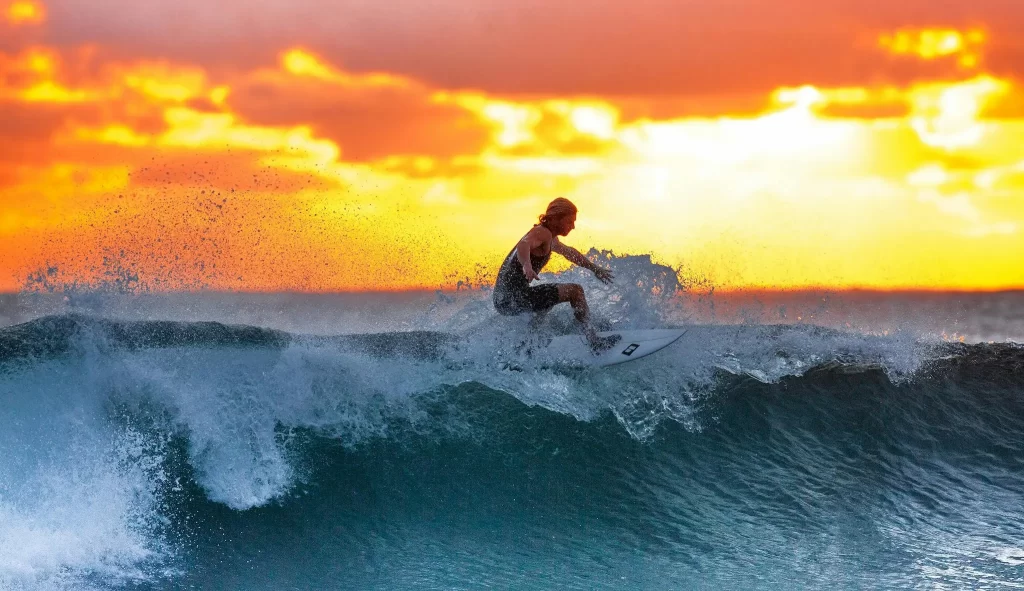
- Freeze: The exact curve of a surfer’s spray or the instant a bird lifts off a railing.
- Blur: The feeling of evening traffic in Patong, the hush of a waterfall, the passage of crowds at a temple.
Once you start seeing shutter speed as a storytelling tool, your choices get easier—and your images feel more intentional.
How to Choose a Shutter Speed (A No-Stress Workflow)
Here’s a simple, repeatable path you can use in any situation—camera or phone app.
- Decide the story. Freeze or blur?
- Pick a starting point. Use the quick reference list below.
- Balance your exposure. If it’s too dark with a fast shutter, open the aperture or raise ISO. If it’s too bright with a slow shutter, add an ND filter (or shoot at dusk/shade) and lower ISO.
- Stabilize. For anything slower than ~1/60s, brace yourself; for 1/15s and below, use a tripod or solid surface.
- Shoot, zoom in, adjust. If it’s blurrier than you want, go faster. If you want more flow, go slower.
Quick starting points (adjust to taste):
- Sports & action: 1/1000s–1/2000s
- People walking / casual street: 1/250s
- Portraits in daylight: 1/125s–1/250s
- Panning with bikes/tuk-tuks: 1/30s–1/60s
- Water blur (waterfalls/sea): 1/2s–2s
- Light trails & night city: 5s–30s
- Astro: 10s–20s (wide lens)
Hand-holding rule of thumb:
Start near 1 / focal length. If you’re using a 50 mm lens, try 1/50s (or 1/80s–1/125s to be safe). Image stabilization helps you go slower, but it doesn’t stop subject movement—only your shake.
When to Use Fast vs. Slow (With Real-World Scenarios)
Let’s put this into everyday terms you’ll actually meet—beaches, markets, scooters, and soft evenings.
Fast shutter: freeze life in motion
- Surfers at Kata Beach: 1/2000s to pin a spray of water at the peak of a turn.
- Kids or pets: 1/500s–1/1000s; bump ISO rather than miss the moment.
- Street candids at noon: 1/250s keeps footsteps sharp; open the aperture to keep ISO low.
- Birds taking off: 1/2000s+; use burst mode and continuous autofocus.
Slow shutter: shape time into mood
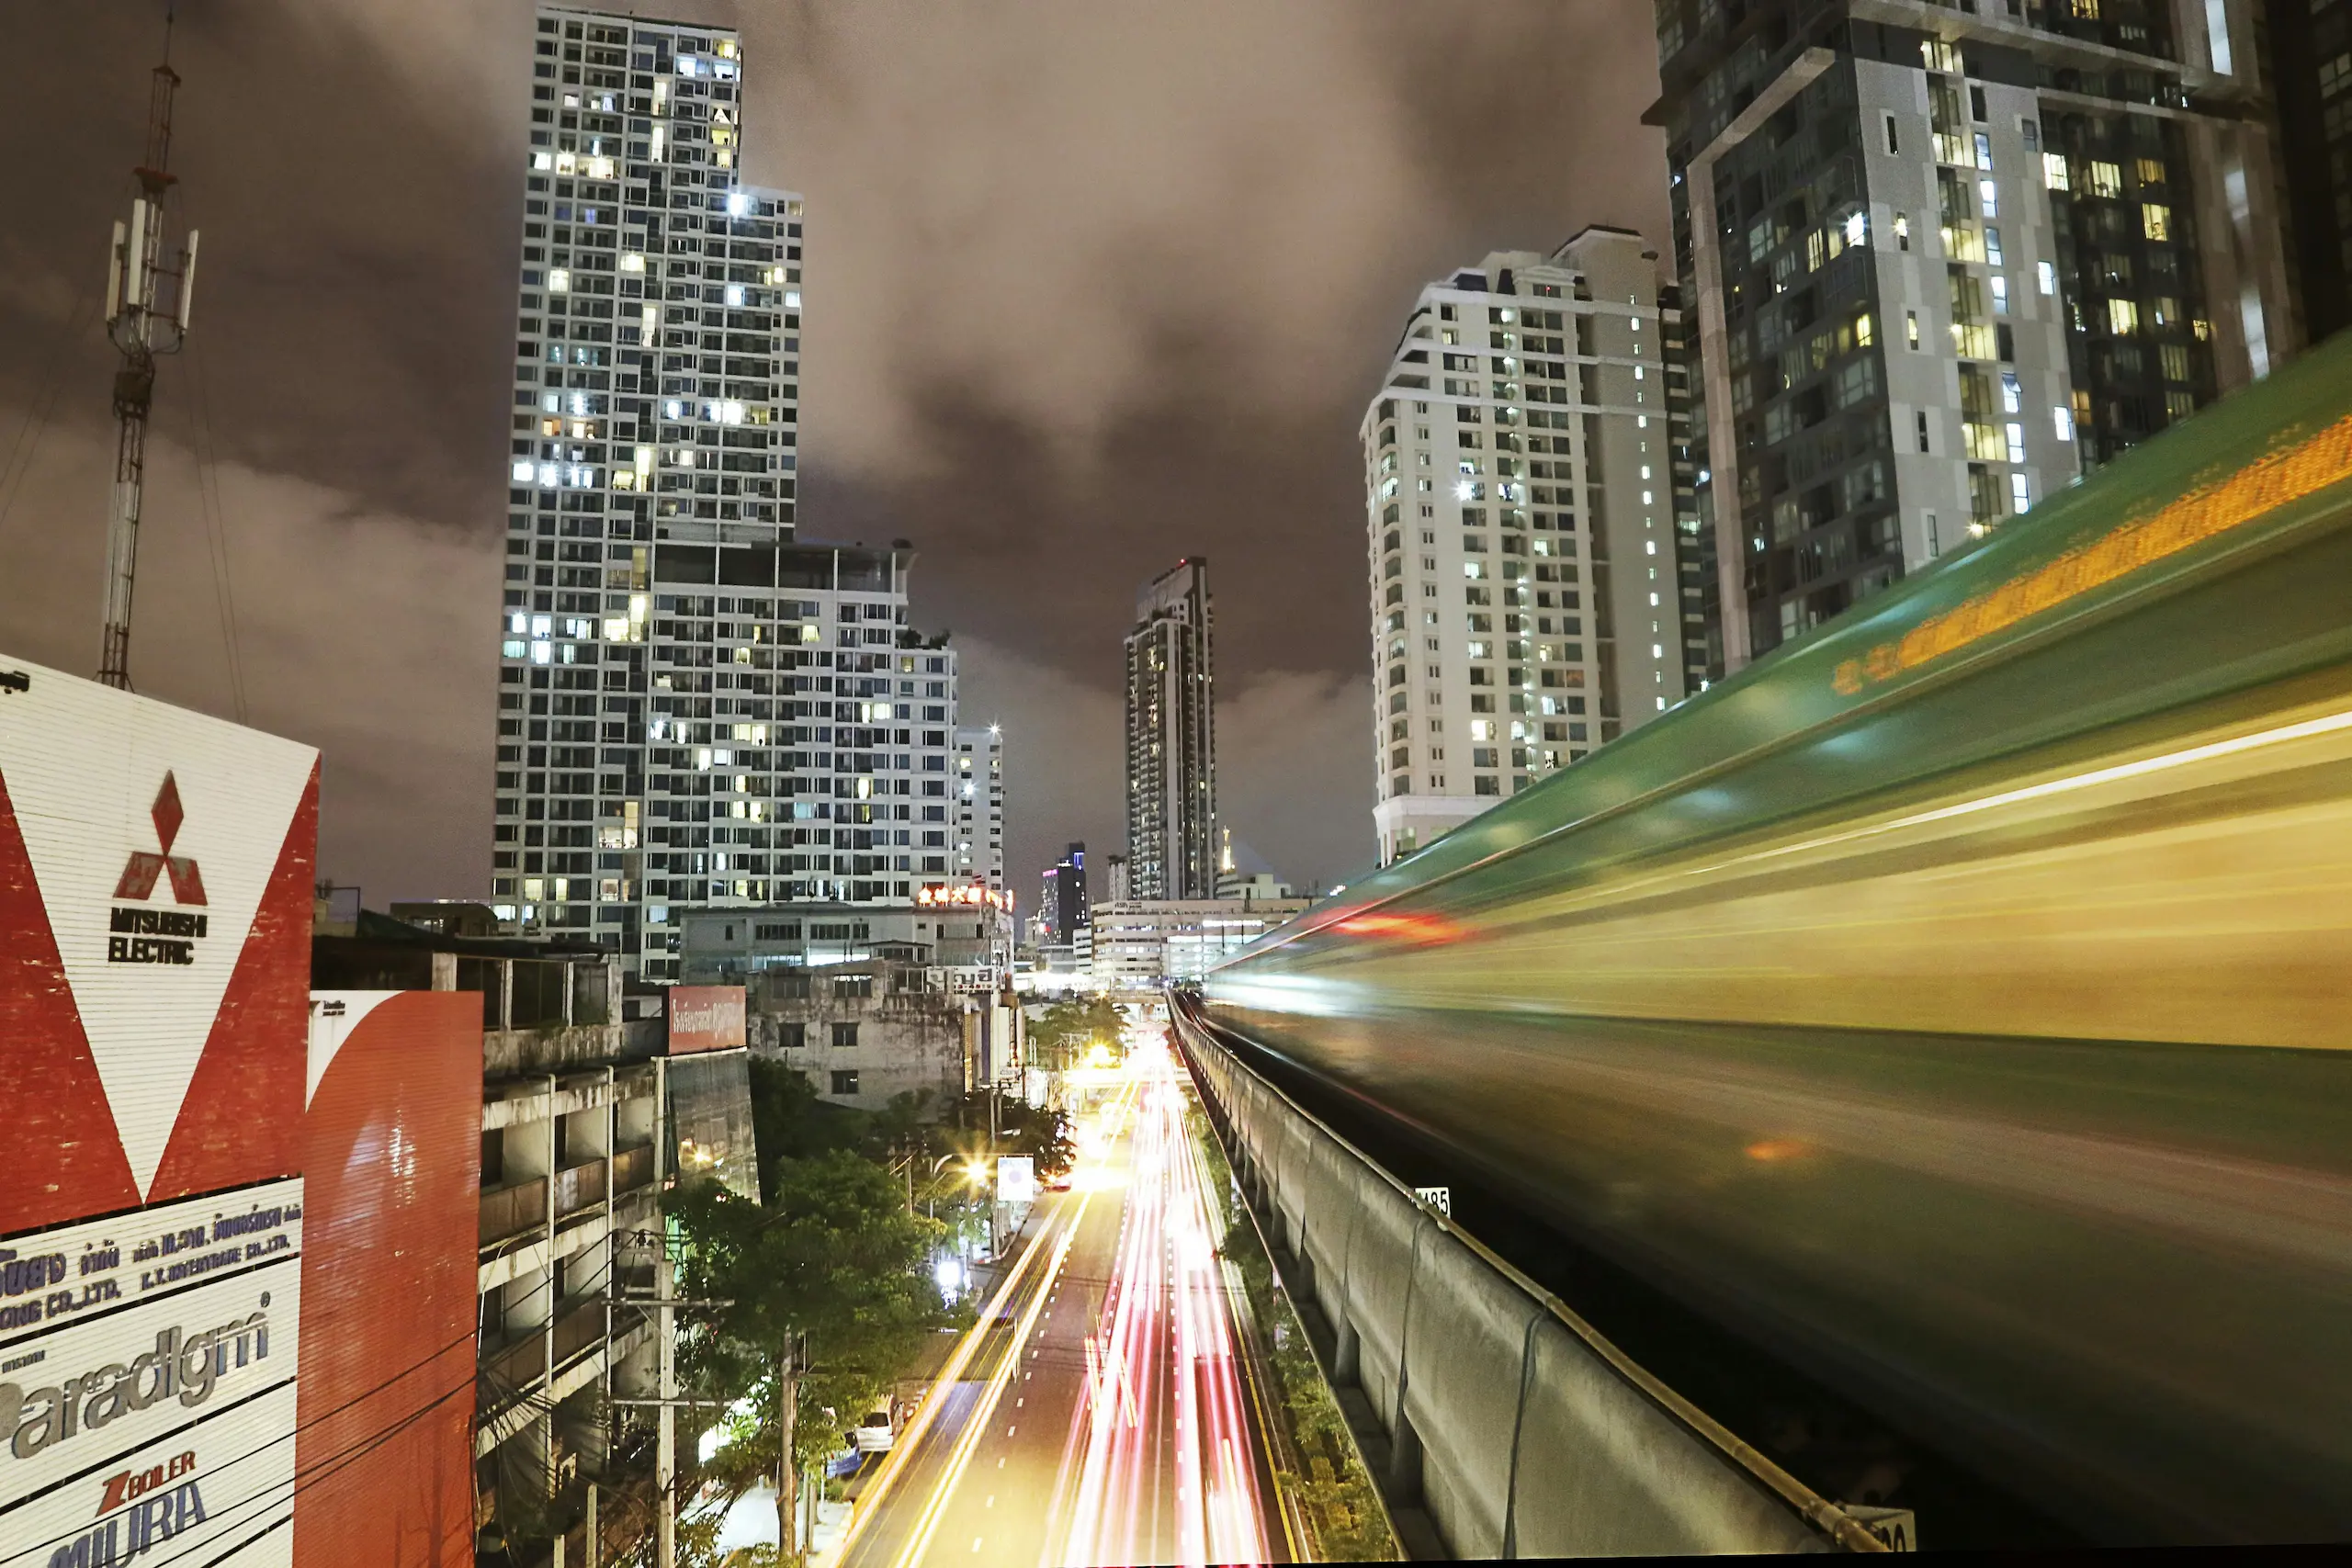
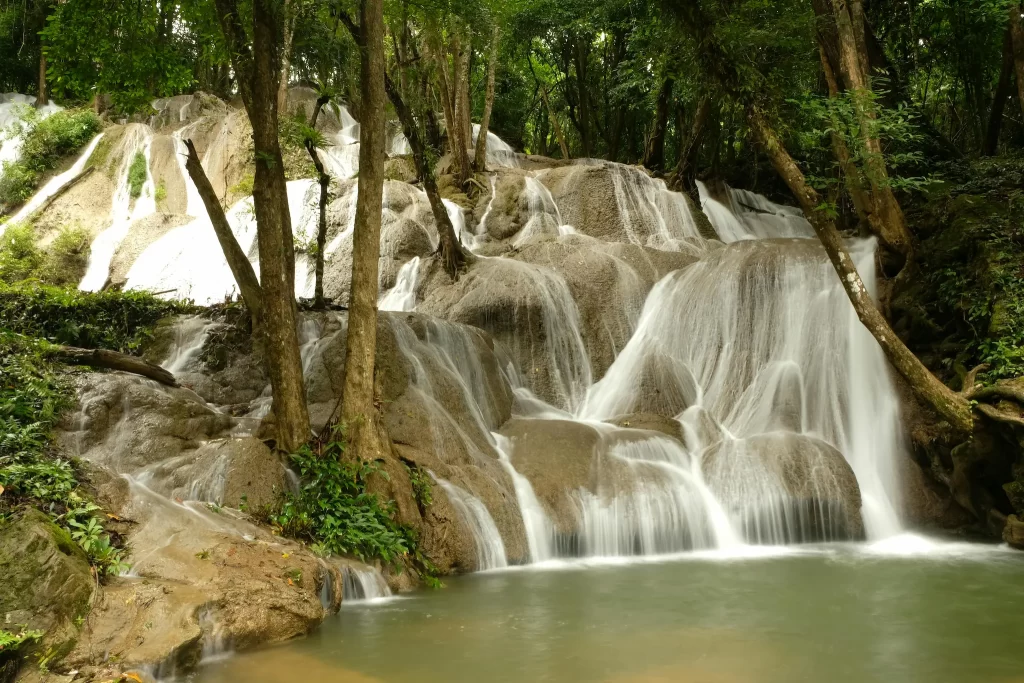
- Waterfalls near Kathu: 1/2s–2s for silky ribbons; tripod + ND filter in daylight.
- Patong traffic at blue hour: 10–20s for bright, clean light trails at low ISO.
- Seascapes at dusk: 1–8s to soften small waves into misty texture.
- Busy temple courtyard: 1–2s to “ghost” the crowd and keep architecture solid.
Creative middle ground
- Panning a scooter: 1/30s–1/60s, follow smoothly as you press the shutter; you’ll get a sharp rider with a streaky background.
- Intentional camera movement (ICM): 1/4s–1s; move the camera during exposure for painterly abstracts—great with trees, waves, or city lights.
The Exposure Triangle, Without the Headache
If shutter speed controls time, aperture controls depth of field (background blur), and ISO controls noise. Pick your priority and let the others support it.
- If you want fast shutter speeds, trade with wider apertures (lower f-numbers) or higher ISO.
- If you want slow shutter speeds in daylight, trade with smaller apertures (higher f-numbers), lower ISO, and ND filters to cut light.
A healthy mindset: exposure is a negotiation, not a test. Choose what matters most to the story (time), then bargain with the other two.
The Gear You Actually Need (and What You Don’t)
You don’t need much to master shutter speed.
Helpful:
- Tripod (any sturdy one) for slow shots and night scenes.
- ND filter (start with a 6-stop or 10-stop) for daylight long exposures.
- Remote release or a 2-second self-timer to avoid shake.
Nice but optional:
- Image-stabilized lens/body – buys you a few stops when hand-holding.
- Neutral shoes and a steady stance – bend your knees slightly, tuck elbows to ribs.
Not required:
- A lens collection that needs its own suitcase. One wide-angle zoom and a standard prime can take you from beaches to city nights.
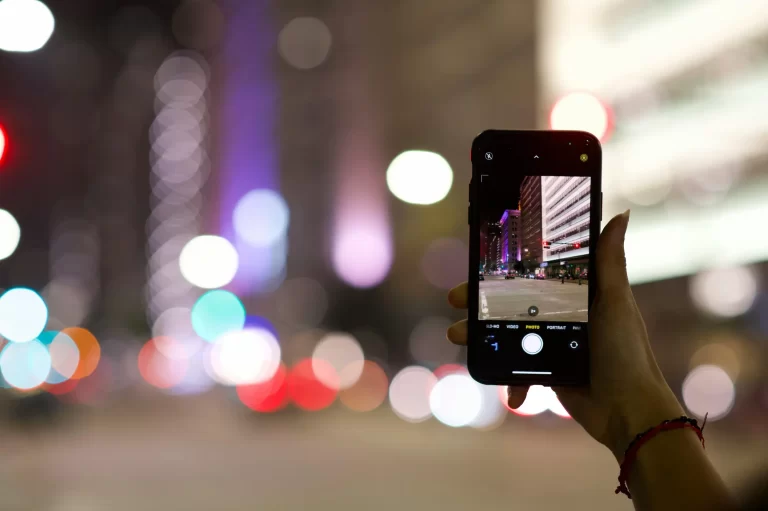
Why This Matters Even If You Only Shoot on a Smartphone
Maybe you’re thinking, “I don’t own a ‘real’ camera.” Doesn’t matter. The idea of shutter speed still shapes your photos—even on a phone—because the phone still exposes for time.
Here’s how to use it without touching a single dial:
- Use your phone’s “Pro/Manual” mode (if available) to set shutter speed directly. Many modern phones let you choose 1/4s, 1/2s, 1s, 2s and beyond.
- Leverage “Live Photo/Long Exposure” or equivalent features to simulate slow shutter for waterfalls and traffic. The phone captures multiple frames and blends them into blur.
- Stabilize the phone. Wedge it against a railing, put it on a low wall, or use a tiny tabletop tripod. Stability is everything for slow shots.
- Shoot at dusk or shade for motion blur. Phones struggle to do long exposures in bright noon light without blowing highlights, so lean into low light.
- Apps can help (search “long exposure camera” in your app store). They often give you control over shutter and ISO, or they blend multiple frames to mimic long exposure with less noise.
Practical smartphone recipes:
- Silky water: Prop the phone on a rock, switch to “long exposure” mode (or 1–2s in Pro), tap to focus, and shoot two or three frames.
- Light trails: Wait for blue hour, brace the phone, aim at an intersection, and use 2–4s. If your phone automates it (“Light Trails” mode), even better.
- Panning a scooter: Many phones don’t let you set 1/30s directly; instead, use Burst and sweep smoothly with the subject. The phone will pick a shorter exposure, but your motion still creates a streaky background in some frames.
Phones are astonishing now. The main limit isn’t hardware—it’s knowing how to make time part of your story. That’s shutter speed, even if you never see the number on screen.
Troubleshooting: Why Did This Shot Miss?
“My photo is too dark at a fast shutter.”
Open the aperture (lower f-number), raise ISO, or add more light. In pinch-dark scenes, let shutter breathe a little slower and stabilize.
“My long exposure is blown out in daylight.”
Use a stronger ND filter, choose shade, or shoot closer to sunset. Keep ISO at base (usually 100) and stop down aperture.
“My subject is still blurry at 1/500s.”
Go to 1/1000s or faster; switch to continuous autofocus and shoot a burst. Time your shot for the “pause” in motion (e.g., the peak of a jump).
“My tripod shot is soft.”
Turn off image stabilization, use a 2-second timer or a remote, and shield the setup from wind. Heavy traffic can shake bridges and boardwalks—move if needed.
“Night shots look gritty.”
You’re pushing ISO to keep the shutter short. Put the camera on something sturdy, slow the shutter, drop ISO, and exhale.
My experiences with shutter speed
The night Patong turned into ribbons
I set up on a footbridge as scooters buzzed below. First frame at 1/60s looked like any other street scene. At 15 seconds, the same view became a river of light—white streams forward, red streams back. Same place, same time, radically different mood. The only thing I changed was shutter speed.
The waterfall that wouldn’t cooperate
Bright noon sun, harsh shadows, and angry highlights. My first slow shot at 1 second blew out the foam. I stepped into shade, added a 6-stop ND, dropped to 2 seconds, and the scene calmed down—the harshness softened into clean strands. The lesson wasn’t technical; it was about patience and looking for softer light.
The toddler who outran my settings
At 1/250s, I was getting almost-keepers: cute expression, slight blur in the hands. Bumping to 1/1000s was the difference between “almost” and “wow.” A tiny change in time, a huge change in story—and the parents framed it the next day.
Your First 30 Minutes of Practice (Camera or Phone)
Set 1: Freeze vs. Blur (10 minutes)
- Photograph passing scooters at 1/1000s (freeze).
- Repeat at 1/30s while panning (blur).
- Compare: Which tells a better story of speed?
Set 2: Water Mood (10 minutes)
- Find moving water (fountain, waves, even rain on a street).
- Shoot at 1/125s, 1/15s, and 1 second (brace or tripod).
- Notice how texture shifts from gritty to smooth.
Set 3: Blue Hour Cleanliness (10 minutes)
- At dusk, place the camera/phone on a stable surface.
- Shoot at 5–15 seconds with the lowest ISO available.
- Watch how long shutter + low ISO gives clean, rich color without noise.
Take notes in your phone as you go. The numbers won’t stick until you use them twice.
Common Myths (Quick Reality Checks)
- “Image stabilization lets me shoot anything slow.”
It helps with your shake, not subject movement. People and scooters will still blur. - “Long exposure is only for night.”
ND filters and shade make long exposures gorgeous at midday—think silky waves and dreamy clouds. - “High ISO always ruins photos.”
A slightly noisy, perfectly timed moment beats a clean, missed one. Use ISO when you need it. - “Shutter Priority is for beginners.”
Pros use it when time is the top priority. It’s a tool, not a badge.
A Short Table You’ll Actually Use
| Scene | Starting Shutter | Stabilize? | Tip |
|---|---|---|---|
| Surf/sports | 1/1000s–1/2000s | No | Raise ISO rather than miss focus |
| Street walking | 1/250s | No | Open aperture in shade |
| Natural-light portraits | 1/125s–1/250s | No | Ask for a breath-hold pose |
| Panning scooters | 1/30s–1/60s | Optional | Follow smoothly, burst 10–15 frames |
| Waterfalls/seascapes | 1/2s–2s | Yes | Use ND or shoot in shade |
| Light trails | 10–20s | Yes | Base ISO; turn off stabilization |
| Astro (wide lenses) | 10–20s | Yes | Use a remote/timer; mind star trails |
Bookmark that in your head. It’ll cover 90% of what you shoot.
Editing Notes to Support Your Shutter Choice
- Frozen action: Add a touch of clarity/texture and a subtle contrast boost. Keep noise controlled but don’t over-smooth detail.
- Motion blur / long exposure: Lower clarity locally in water for silk, raise contrast and whites for light trails, and keep color clean (cooler for water, warmer for city nights).
- Mixed scenes: Brush tools are your friend—sharpen the subject; soften the background.
Post-processing shouldn’t rescue the wrong shutter choice; it should honor it.
FAQ (Rapid-Fire)
What shutter speed should I use for sports?
Start at 1/1000s. If it’s still blurry, go faster and raise ISO.
How do I blur water in daylight without overexposure?
Use ND filters, lower ISO, stop down the aperture, and look for shade. Aim for 1/2s–2s.
Is 1/60s okay for portraits?
Sometimes. Safer at 1/125s or faster—especially with longer lenses.
Why are my night photos grainy at fast shutter speeds?
You’re pushing ISO. Stabilize, slow the shutter, drop ISO, and the noise falls away.
Can I do all this on my phone?
Yes. Use Pro/Manual modes or long-exposure features, stabilize the phone, and shoot at dusk for cleaner results.
If You Remember Only Three Things
- Pick the story first: freeze or blur.
- Start with a sensible baseline: e.g., 1/1000s for action, 1/30s for pans, 1–10s for long exposures.
- Stabilize when you slow down: your keeper rate will thank you.
take Action now
If this guide helped you make sense of time, take it for a spin tonight. Head out at blue hour, put your camera or phone on a railing, and make a 10-second photo of the world moving through your frame. Then:
- Share your favorite result and tag Reflections Photography—we’d love to see it.
- Download the Night Photography Cheat Sheet to keep settings in your pocket.
- Ready to grow faster? Join our Capture with Confidence course and get a friendly, structured path from “experimenting” to “nailed it.”
Time is the most generous ingredient in photography. Learn to shape it, and your pictures will stop looking like everyone else’s—and start looking like yours.
Want to put this into practice and have some fun?
Come out with me on a Photography Adventure Tour in Phuket—think Freedom Beach sunrise seascapes, Old Town light trails, and golden-hour temple portraits. Small groups, beginner-friendly, and camera or smartphone welcome. Check dates and details on the tours page and let’s make something beautiful together
Next Steps (Internal Resources You’ll Love)
- Exposure Triangle for Beginners – a simple, friendly companion to this article.
- Aperture Made Easy (Depth of Field Without the Jargon)
/blog/aperture-beginners-guide - ISO Demystified (Clean Images in Any Light)
/blog/iso-settings-explained - Night Photography Cheat Sheet (Downloadable) – your field guide for long exposures.
/shop/night-photography-cheat-sheet - Capture with Confidence (Beginner Course) – step-by-step lessons, real assignments, video demos.