Exposure Triangle Explained Simply (Beginner Guide)
Most beginners don’t struggle with photography because it’s complicated. They struggle because no one has clearly explained what actually matters.
The exposure triangle is often mentioned, but rarely understood in a way that helps you make real decisions when you’re holding the camera.
Once this clicks, camera settings stop feeling random—and you start knowing exactly what to adjust and why.
Learning photography often feels confusing at the beginning. Many new photographers quickly encounter terms like aperture, shutter speed, and ISO, but understanding how these settings actually work together can be difficult.
This is where the exposure triangle becomes easier to understand. When explained clearly, it provides a simple way of seeing how three key camera settings control the brightness and overall look of a photograph.. Instead of memorising random settings, photographers learn how aperture, shutter speed, and ISO interact to produce a properly exposed image.
Once you understand the photography exposure triangle, camera settings start to make much more sense. Rather than guessing which setting to change, you begin to see how adjusting one part of the triangle affects the others.
If you’re new to photography, it also helps to understand the basic camera controls themselves. Our guide to camera settings explained walks through the most important camera settings beginners need to understand before moving deeper into manual shooting.
In this guide, we’ll break down the exposure triangle in simple terms, explain each of the three settings clearly, and show how they work together so you can start choosing camera settings with confidence.
What Is the Exposure Triangle
Quick Summary
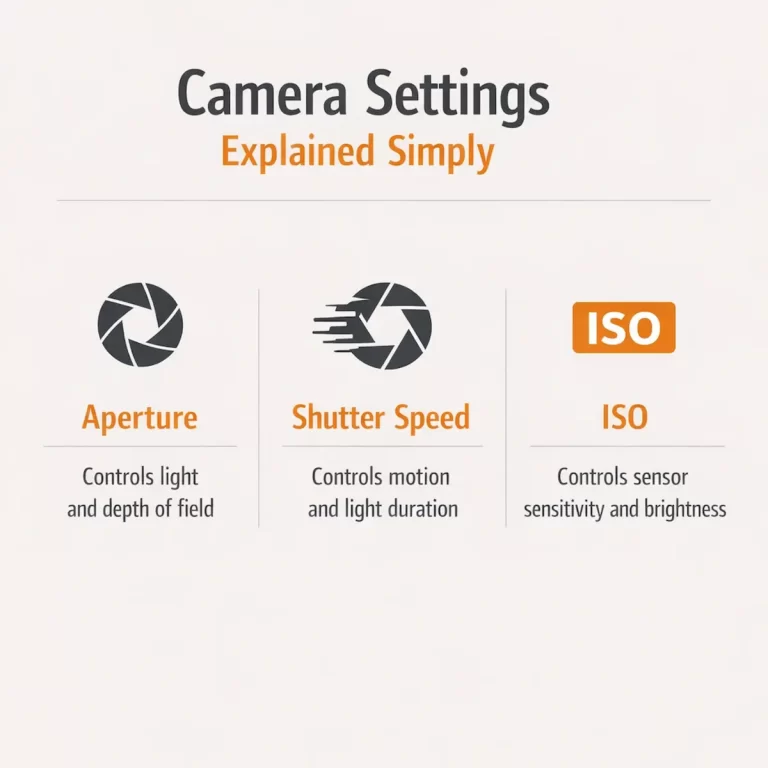
- Aperture controls how much light enters through the lens
- Shutter speed controls how long light hits the sensor
- ISO controls how sensitive the sensor is to light
- All three must balance to create a properly exposed image
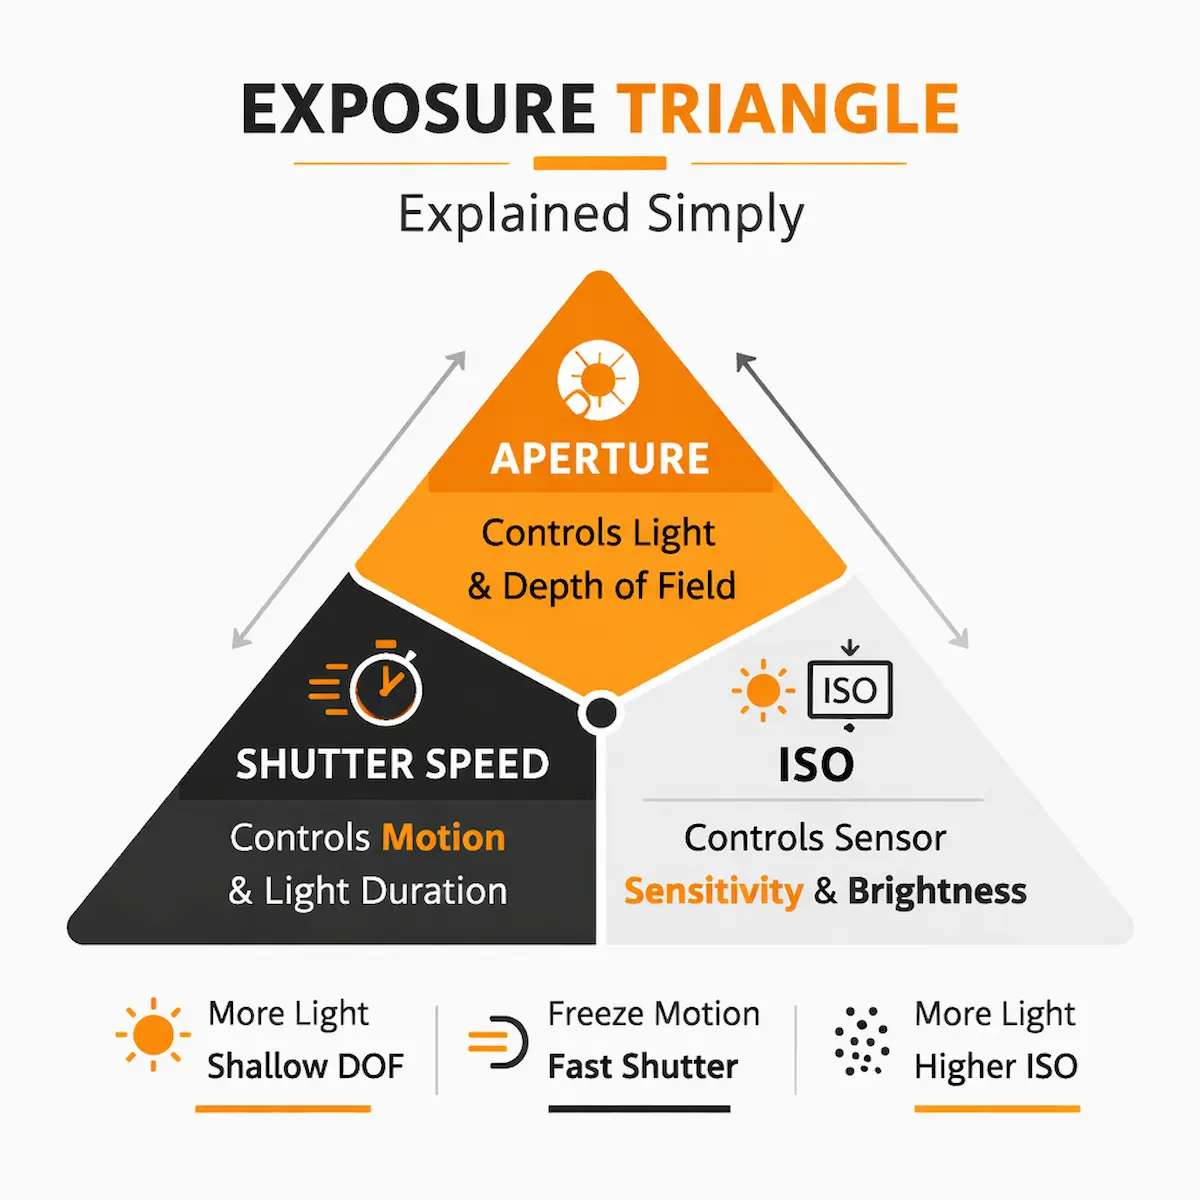
The exposure triangle is a simple concept used in photography to explain how three camera settings control the brightness of an image. These three settings are aperture, shutter speed, and ISO, and together they determine how much light reaches the camera sensor.
When photographers talk about the exposure triangle, they are describing how these three settings work together to produce a properly exposed photograph. If too much light enters the camera, the image will appear too bright. If too little light reaches the sensor, the photograph will appear dark.
Each part of the exposure triangle controls light in a different way.
- Aperture controls how wide the opening in the lens is.
- Shutter speed controls how long the camera sensor is exposed to light.
- ISO controls how sensitive the camera sensor is to light.
Because these settings are connected, changing one usually means adjusting another. For example, if you increase shutter speed to freeze motion, less light enters the camera, so you may need to open the aperture or raise the ISO to maintain the correct exposure.
This relationship between aperture, shutter speed, and ISO is also often referred to as the aperture ISO shutter speed triangle.
A helpful visual explanation of how these three settings interact can also be found in this detailed exposure triangle photography tutorial from Cambridge in Colour, one of the most respected educational resources for learning photography fundamentals.
Many professional photographers and photography educators use the exposure triangle as a foundational teaching model because it simplifies complex camera behaviour into a clear decision-making framework.
Understanding this simple relationship is the foundation of controlling exposure and learning to move beyond automatic camera modes.
If you want a quick visual reference for remembering how these three settings work together, you can download the Exposure Triangle Cheat Sheet and keep a simple visual reference with your camera while you shoot
Aperture Explained Simply
Aperture refers to the opening inside your camera lens that allows light to pass through to the camera sensor. You can think of it like the pupil in your eye. In bright conditions your pupil becomes smaller to reduce the amount of light entering your eye. In darker conditions your pupil opens wider to allow more light in.
Camera lenses behave in a very similar way. When the aperture opens wider, more light enters the camera. When the aperture is smaller, less light reaches the sensor.
Aperture is measured using f-numbers, often written as f/2.8, f/4, f/5.6, f/8 and so on. One thing that often confuses beginners is that smaller numbers represent larger openings. For example, f/2.8 allows much more light into the camera than f/11.
This is why aperture plays an important role in the photography exposure triangle. A wide aperture lets in more light, which can brighten the image, while a smaller aperture reduces the amount of light entering the camera.
Aperture also affects something called depth of field, which refers to how much of the image appears in focus.
A wide aperture such as f/1.8 or f/2.8 creates a shallow depth of field, where the subject appears sharp but the background becomes blurred. This is commonly used for portraits.
A narrower aperture such as f/8 or f/11 keeps more of the scene in focus, which is why these settings are often used for landscapes and travel photography.
Because aperture influences both light and focus, it is often one of the first settings photographers adjust when working with the exposure triangle. As your understanding improves, choosing the right aperture becomes much easier. If you would like to see how aperture fits into a complete camera setup, our guide to beginner photography settings explains how photographers typically choose their starting settings when taking a photo.
Shutter Speed Explained
Shutter speed controls how long the camera sensor is exposed to light when you take a photograph. When you press the shutter button, a small mechanical curtain inside the camera opens and then closes again. The amount of time that curtain stays open is known as the shutter speed.
Shutter speed is usually measured in fractions of a second, such as 1/1000, 1/500, 1/250, 1/125, or 1/60 of a second. Faster shutter speeds mean the camera captures the scene very quickly, while slower shutter speeds allow light to reach the sensor for a longer period of time.
A fast shutter speed lets in less light but freezes motion. This is useful when photographing subjects that are moving quickly, such as sports, wildlife, or people walking through a busy street scene.
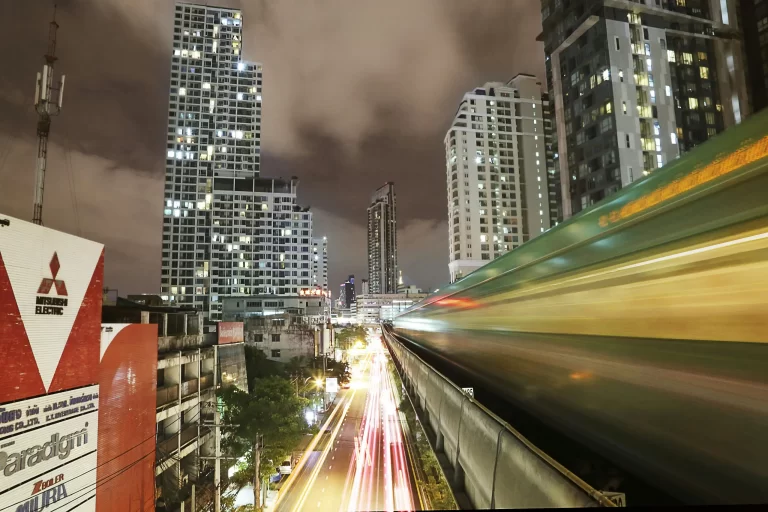
A slow shutter speed allows more light to enter the camera but also increases the chance of motion blur. Slower speeds are often used intentionally for creative effects, such as capturing flowing water, light trails at night, or movement in a scene.
Because shutter speed controls both motion and light, it plays an important role in the photography exposure triangle. If you increase the shutter speed to freeze action, less light enters the camera, so you may need to adjust either aperture or ISO to maintain a balanced exposure.
Many photographers prioritise shutter speed when photographing people or fast-moving scenes. In fact, if you are photographing life in busy public places, understanding shutter speed becomes essential. Our guide to street photography settings explains why photographers often choose faster shutter speeds when working in unpredictable environments.
Learning how shutter speed affects both motion and brightness is an important step toward understanding how the exposure triangle is explained in practice.
ISO Explained
ISO controls how sensitive your camera sensor is to light. In simple terms, ISO allows the camera to make the image brighter without changing the amount of light coming through the lens.
Most cameras start with a base ISO such as ISO 100 or ISO 200, which works well in bright daylight. As lighting conditions become darker, photographers often increase ISO so the camera can capture a brighter image.
Typical ISO values might look like this:
- ISO 100 – bright daylight
- ISO 200–400 – cloudy conditions
- ISO 800–1600 – indoor or evening light
- ISO 3200 and above – very low light
Increasing ISO can be extremely useful when you cannot change other settings easily. For example, if you are already using a fast shutter speed to freeze motion and a wide aperture to allow more light in, raising ISO may be the only option left to achieve a proper exposure.
However, higher ISO settings also introduce something called digital noise, which appears as grain or texture in the image. Modern cameras handle higher ISO much better than older cameras, but photographers still try to keep ISO as low as practical for the cleanest image quality.
This is why ISO forms the third side of the photography exposure triangle. When aperture and shutter speed reach their practical limits, ISO allows photographers to balance exposure.
In darker environments this setting becomes especially important. If you want to see how photographers handle these situations in practice, our guide to low light photography settings explores how ISO is typically used when light becomes limited.
How the Three Work Together
Understanding each setting individually is useful, but the real key to photography is understanding how aperture, shutter speed, and ISO work together. This relationship is exactly what photographers mean when they talk about the exposure triangle.
Each setting controls light in a different way, but they must remain balanced to produce the correct exposure.
For example, imagine you are photographing a person outdoors on a bright day. You might choose f/2.8 to create a soft blurred background. Because that wide aperture lets in a lot of light, you may need to increase the shutter speed to 1/1000 to prevent the image from becoming too bright. In this situation, ISO might remain low, such as ISO 100, because there is already plenty of light available.
Now imagine photographing the same scene later in the evening. Light levels drop, so the camera needs more light to produce the same exposure. You might keep the aperture wide at f/2.8, slow the shutter speed slightly to 1/250, and increase ISO to 400 or 800.
This balancing process is the heart of the photography exposure triangle. When one setting changes, another usually needs to adjust to maintain a correct exposure.
Many photographers simplify the decision process by thinking about what each setting primarily controls:
- Shutter speed controls motion
- Aperture controls depth of field
- ISO controls brightness when light is limited
Once you begin thinking this way, choosing camera settings becomes much easier. Instead of randomly adjusting controls, you start making intentional decisions about how the photograph should look.
If you want to take full control of this process, learning to use manual camera settings can help you understand exactly how these adjustments affect your photos.
Many photographers also find it useful to keep a quick reference nearby. Our photography settings cheat sheet provides a simple visual reminder of how these three settings interact.
If you’d like a simple visual reminder you can keep in your camera bag, you can download the Exposure Triangle Cheat Sheet to quickly remember how aperture, shutter speed and ISO balance exposure.
At a practical level, most photographers are not thinking about all three settings equally at the same time. Instead, they usually decide what matters most in the scene first—motion, depth, or light—and then adjust the other two settings around that priority.
Common Beginner Mistakes
When first learning how the exposure triangle works, many photographers make a few common mistakes. These mistakes are completely normal and usually happen while people are still learning how aperture, shutter speed, and ISO interact.
One of the most common mistakes is raising ISO too quickly. Beginners often increase ISO because it brightens the image immediately. While this works, high ISO settings can introduce noise or grain into the photograph. In many situations it is better to first consider adjusting aperture or shutter speed before increasing ISO too much.
Another common issue is using a shutter speed that is too slow. When shutter speed becomes too slow, even small movements from your hands can cause the image to appear blurred. As a general rule, many photographers try to keep shutter speeds faster than 1/125 when handholding the camera, especially when photographing people.
Some beginners also leave their lens wide open all the time, using settings like f/1.8 or f/2.8 because they produce attractive background blur. While this can work well for portraits, it is not always ideal for landscapes or travel photography where you want more of the scene in focus.
Another mistake is treating each setting independently instead of thinking about the photography exposure triangle as a balanced system. Changing one setting almost always requires adjusting another to maintain the correct exposure.
The good news is that these mistakes are simply part of learning. As you become more comfortable with how the exposure triangle works, choosing the right settings becomes much more intuitive.
Example Exposure Settings
Seeing real examples can make the exposure triangle much easier to understand. The exact settings will always depend on the lighting conditions and the subject you are photographing, but a few simple starting points can help beginners understand how the triangle works in practice.
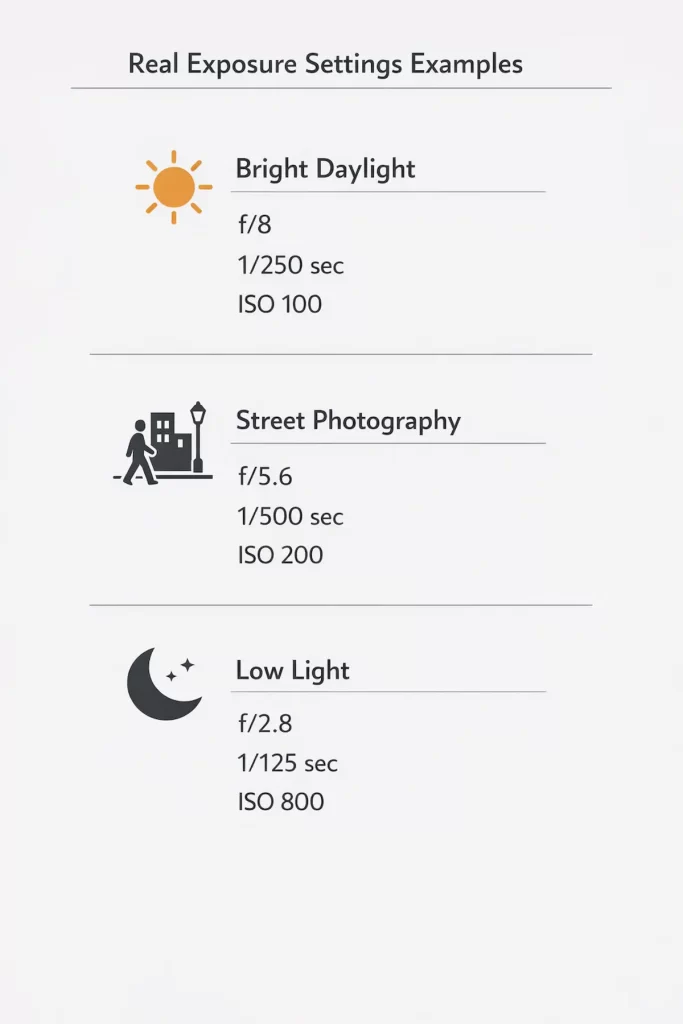
For example, imagine photographing a landscape on a bright day. A common starting point might be f/8, 1/250, ISO 100. The smaller aperture keeps much of the scene sharp, the shutter speed is fast enough for handheld shooting, and the low ISO keeps the image clean.
If you were photographing people walking through a busy street, you might prioritise shutter speed to freeze motion. A possible combination could be f/5.6, 1/500, ISO 200. The faster shutter speed helps capture movement while still maintaining a balanced exposure.
In darker conditions, such as indoors or during the evening, you might need to allow more light into the camera. A common example could be f/2.8, 1/125, ISO 800. The wider aperture and higher ISO compensate for the reduced light.
These examples show how photographers constantly balance the exposure triangle depending on the situation. When travelling, lighting conditions can change quickly, which is why many photographers develop a flexible approach to travel photography settings.
Understanding exposure is also one of the key skills if you want to take better travel photos, since correct settings allow you to capture scenes as they actually appear.
If you would like a quick reference you can keep with your camera bag, the Exposure Triangle Cheat Sheet provides a simple way to remember how aperture, shutter speed, and ISO work together.
The Photography Cheat Sheet Bundle includes printable reference guides covering exposure, camera settings, travel photography and more.
If you want to go deeper into how photographers think about camera decisions and real-world shooting situations, the ebook The Confident Photographer – Taking More Photos Worth Keeping explores the thinking behind capturing photographs you will actually want to keep.
Frequently Asked Questions
1. What is the exposure triangle in photography?
The exposure triangle is a simple way to understand how aperture, shutter speed, and ISO work together to control the brightness of an image. Each setting affects light differently, and balancing all three helps create a properly exposed photograph.
2. Why is the exposure triangle important?
The exposure triangle is important because it helps photographers move beyond automatic settings and take control of their camera. Once you understand how the three settings interact, you can make intentional decisions about brightness, motion, and depth of field.
3. What are the three elements of the exposure triangle?
The three elements are aperture, shutter speed, and ISO. Aperture controls how much light enters the lens, shutter speed controls how long light reaches the sensor, and ISO controls how sensitive the sensor is to light.
4. Which setting should I adjust first?
It depends on what matters most in your photo. If your subject is moving, start with shutter speed. If background blur is important, start with aperture. If light is limited, ISO is usually adjusted last to help balance exposure.
5. Does increasing ISO reduce image quality?
Yes, increasing ISO can introduce digital noise, which appears as grain in your image. While modern cameras handle higher ISO better than before, photographers still try to keep ISO as low as possible for cleaner image quality.
6. Is the exposure triangle only for manual mode?
No, the exposure triangle applies to all camera modes. Even in semi-automatic modes like aperture priority or shutter priority, the camera is still balancing these three settings behind the scenes.
7. How long does it take to understand the exposure triangle?
Most beginners can understand the basics quickly, but becoming comfortable using it takes practice. As you take more photos and adjust settings in different situations, the relationship between aperture, shutter speed, and ISO becomes much more intuitive.